In this tutorial, I will show you a simple three-step process to add Twitter, LinkedIn, and Facebook card images to your Gatsby blog.
As it turns out, it’s a bit more complicated than simply importing your thumbnail into the Seo component and passing it as a variable into the meta tags.
From a high-level: we will first define the thumbnail in the front matter of our blog post (step 1). We will then pull the thumbnail into src/templates/blog-post.tsx and pass it into the Seo component where the meta tags are defined (step 2). Finally, we will receive the thumbnail from within the Seo component and add it to the appropriate meta tags (step 3).
Result: At the end of this tutorial, you will be able to share links to your blog on Twitter, Facebook, and LinkedIn with custom images for each blog post.
Step 0: Create a Gatsby Blog
The Gatsby starter blog comes with the required packages for this tutorial. If you’ve already created your blog using the Gatsby Starter Blog Template, you can skip this step. If you haven’t, you will need to run the code below to generate your new blog:
gatsby new my-blog-starter https://github.com/gatsbyjs/gatsby-starter-blogIf you are not using the Gatsby starter blog template, make sure to install the following packages: react-helmet, gatsby-source-filesystem, gatsby-transformer-remark, gatsby-remark-images, gatsby-transformer-sharp.
Step 1: Insert the Image and Set the Front Matter Property
Navigate to the content/blog directory.
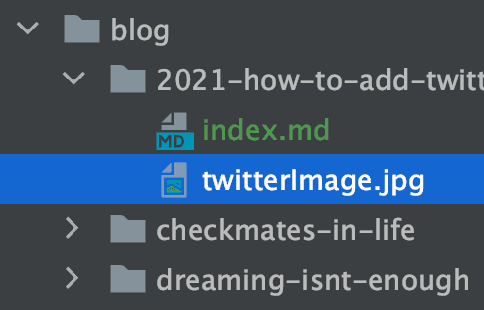
Insert your thumbnail next to the index.md file inside a specific blog directory.
Note: It is recommended to use a thumbnail with dimensions 1200x628px.

Next, open up the index.md file and add a link to your thumbnail in the front matter.
---
title: Blog Title
date: "2021-06-24T12:00:00.284Z"
description: "Blog description"
thumbnail: "./twitterImage.jpg"
---
Step 2: Access the Thumbnail in Blog Post Component
Navigate to blog-post.tsx.
Next, we need to access the thumbnail from within blog-post.tsx so that we can send it to the Seo component.
Add the thumbnail field to your blog-post page query as shown below:
export const pageQuery = graphql`
  query BlogPostBySlug(
    $id: String!
    $previousPostId: String
    $nextPostId: String
  ) {
    site {
      ...
    }
    markdownRemark(id: { eq: $id }) {
      ...
      frontmatter {
        title
        date(formatString: "MMMM DD, YYYY")
        description

        thumbnail {
          childImageSharp {
            fixed(width: 1200) {
              ...GatsbyImageSharpFixed
            }
          }
        }
        ...
      }
    }
  }
`
In the same file, go to the BlogPostTemplate component and add a constant named thumbnail.
const BlogPostTemplate = ({ data, location }) => {
    const post = data.markdownRemark
    const siteTitle = data.site.siteMetadata?.title || `Blog - Cole Striler`
    const {previous, next} = data
    const {siteUrl} = data.site.siteMetadata
    const thumbnail = post.frontmatter.thumbnail
    ...
}
Now we can pass the thumbnail to the Seo component.
<Seo
    title={post.frontmatter.title}
    description={post.frontmatter.description || post.excerpt}
    thumbnail={thumbnail}
/>
Step 3: Add Thumbnail to Meta Tags in Seo Component
Navigate to seo.tsx.
Finally, we need to receive the thumbnail from within the Seo component and add it to the meta tags.
Update your code to pull in the thumbnail:
const Seo = ({ description, lang, meta, title, thumbnail }) => {Next, we need to build a custom link that tells the browser where to look for our new thumbnail. Add imageSrc and image to the Seo component under the static query.
const {site} = useStaticQuery(
    ...
  )
const imageSrc = thumbnail && thumbnail.childImageSharp.fixed.src;
const image = site.siteMetadata?.siteUrl + imageSrc;
The above code should build the correct link to your thumbnail, but if it doesn’t, you need to modify the path that generates your imageSrc.
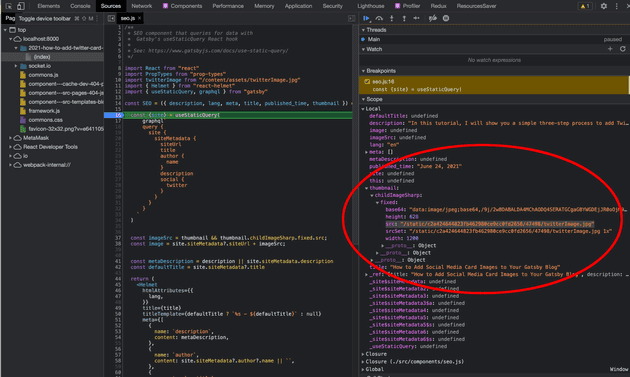
To find the source of your image, inspect the browser window and set a breakpoint at the beginning of the Seo component. Open up the local variables and find the path to the src within the thumbnail variable.
In the far right of the screenshot below, you can see that the src of my thumbnail is under the path thumbnail.childImageSharp.fixed.src.

Note: Do NOT use the following code to fetch your site URL
let origin = "";
if (typeof window !== "undefined") {
  origin = window.location.origin;
}
const image = origin + imageSrc;
If you use the above code, when you run gatsby build, location and origin will not be available, which will set the origin variable to undefined.
You MUST use the siteUrl generated from the siteMetadata to build the URL or else you may run into issues like this.
Finally, add the following image meta tags to your array of tags:
{
  property: `og:image`,
  content: image
},
{
  name: `twitter:image:src`,
  content: image,
},
Boom! That’s it.
Conclusion
Now you can add custom thumbnails to each blog post that will make your links much prettier on social media. You can use the following sources to verify that your card images are working as expected: Twitter Card Validator, LinkedIn Post Inspector, and Facebook Debugger Tool.